Saturday, January 17, 2015

Day 17 - Performance Management Charts

This is probably a little nerdy for some of you. You've been warned. I'm trying to keep this as basic as possible.

I'm sure there are write-ups way better than this. If you already use a PMC, you probably know as much or more than I do. 

Performance Management Charts are pretty cool. They show your fitness, short term fatigue, and can predict if whether or not you'll have good form at a race. Most of the "big name" cycling apps have them. Strava, Training Peaks WKO, Golden Cheetah, etc.  Here's what you need to get started. 

  • A powermeter. Technically, you could estimate training stress for each workout, but it won't be very accurate, therefor it wouldn't be of much value. So lets just say that you need a powermeter. Quarq, Powertap, Stages, etc. They'll all work. A powercal may or may not.
  • You need to know your FTP. You'll need to enter that into your app of choice.
  • At least 6 weeks of data in order to get any data, but 12 or more weeks are preferable. 
  • Strava Premium ($), WKO ($$), Golden Cheetah (FREE). I use Golden Cheetah

Some quick definitions - way more detail is here, but I'm trying to keep this simple: http://home.trainingpeaks.com/blog/article/what-is-the-performance-management-chart
  • Training Stress Score (TSS) - This is calculated for each ride. It's based off your FTP, so a 100 point ride for a pro and a 100 point ride for an amateur would create the same level of fatigue, but the distance or time could be way different. IF you say your FTP is higher than it actually is, all of the stats on your PMC will be low. If you sandbag your FTP and put in a low number, all the lines on the PMC will be too high. I'll just copy some TSS info from the training peaks site, since it gives a better explanation than I can.
    • You earn 100 TSS for an all out, 100%, 60-minute workout. Of course most workouts are not completed at 100%, so most workouts will accumulate less than 100 TSS per hour.
    • You can earn more than 100 TSS within a single workout (as long as it is longer than an hour), but never more than 100 TSS per hour.
    • Think of intensity as an RPE value on a scale of 1-10, 10 being the hardest. If you exercised at a level 5 for two hours, then you would accumulate 50 TSS/hour or 100 total points. It wouldn’t matter if you were training for the Tour de France or to simply complete your first triathlon.
  • Chronic Training Load (CTL) - Basically, this is your long-term fatigue, but we will all it fitness. It his weighted average of you TSS over the last 6 weeks. The more you workout and harder you work out, the higher your CTL gets.  The higher your CTL, the more fit you are.
  • Acute Training Load (ATL) - This is your short term fatigue, but we will just call it fatigue. It's a weighted average of your TSS over the last 7 days. I think you can adjust the number of days, but I think 7 is a good default. 
  • Training Stress Balance (TSB) - This is your "form." It's a combo of training stress and rest. This is a predictor of how you will do on race day. When the line is going up, you'll perform better than when the line is going down. A positive number shows good form. IF the number is negative, you'll be too tired to have great form. 

Blah Blah Blah. Let's look at my PMC from last year and see if we can draw some conclusions. 


I took some time off after my ironman in August, so all my numbers started pretty low. You can see the blue (CTL) and pink (ATL) start increasing once I started training again. This means that my fitness is increasing, but so is my fatigue. That's why my green (TSB) line is going down. You can see that in general the TSB is exactly opposite of ATL.

My goal is to try and get the blue line as high as possible before the season starts (without cheating and sandbagging my FTP). This means riding lots and lots of miles as a moderate intensity. On Feb 3 it starts to level out a bit. A week before that was our training camp, and that's why my pink line (ATL) jumped up so high. You can see that my green line is at an all time low around training camp. If I was to race the day after camp, I would have been really tired and had bad form. After camp I took a recovery week. You can see that the pink line (ATL) drops a bit and the green line goes up. As the green line was going up, I raced at Cedar Hill and won. The PMC predicted a good race, and it was.


At this point on my chart, the blue line is pretty high. That means I'm carrying maximum fitness. Since I was focusing on mostly the spring races, it was time to "withdraw some fitness from the bank." Since I was racing every weekend and recovering during the week, the pink line started to slowly decline and the green line was slowly increasing. This meant that I more or less carried good form all the way until mid-to-late April. The weekend of Joe Martin I was actually at my highest TSB. Unfortunately, I didn't go race. Bummer. I did a TT the following week and set my all-time PR on that course. I think that the fact that I wasn't racing Joe Martin was a reason for me to take some extra rest, which is what caused my TSB to rise so much. Unfortunately, these easy weeks also dropped my CTL a bit. 

I felt great during that whole February - April stretch. I had pretty consistent results. No wins after Cedar Hill, but some results I'm proud of. After that stretch, it was time to try and raise my CTL a bit and get ready for crit season. You can see that I had a good 3 week build going into May. Then I probably took too much time off. I should have kept training a few more weeks in order to peak again for pro-am and tulsa tough. My TSB was really high at Tulsa Tough, but my fitness level (blue line) had already dropped some. I had some decent races, but nothing great to speak of. 

So there are some ways that I think a person could "trick" the PMC but not get good results. For example, if I took a full week completely off from riding, the TSB would jump way up; however, I don't think that means I would race good. I never feel good after a full week off. If I took two full weeks off, it would even be higher, but I think I would race even worse. 

TSB also doesn't know your strengths and weaknesses as a racer. If you are a poor climber with a high TSB going into a climbing race, it doesn't mean you'll win. You'll probably climb better than you would have with a lower TSB, but it doesn't turn you into a guy named Alberto. It also can't predict what will happen in a race. IF you miss the winning breakaway, you still lose the race, no matter what your TSB is. 

So the PMC isn't perfect, but it does seem to line up pretty well with how I felt last season. By having this data, I'm able to perform small tweaks to my training this season to figure out how to bring better form to the races I really care about...hopefully. 

Friday, January 16, 2015

Day 16 - Sleep

I like to get a lot of sleep. Since I train almost every day, it's never very difficult for me to fall asleep early.

I think that sleep and rest are overlooked by a lot of cyclists. Actually, I think it’s overlooked by a lot of people in general. I used to stay up late, wasting time on the internet or watching tv. I’d sleep with my TV on, or with a movie. I’d say 6 hours of sleep per night was about average for me back then. 

I can’t prove it, but I think that the lack of sleep back then made me less effective at everything I did. Athletically, I didn’t see the same progress that I see now. You’d think that 19 year old me would respond better to training than 30 year old me; but I don’t think I did. I wasn’t as mentally focused. I remember constantly dosing off in air force classes. My comprehension of what I was taught didn’t seem as high as it is now. My diet now isn’t all that much different than it was then. The biggest thing I think changed was my extra sleep.

It’s rare that I don’t get at least 8 hours of sleep in a night. I’m usually out cold by 10:30 and wake up between 6:30 and 7:00. With over 8 hours of sleep, I feel like my body recovers quickly from workouts. Mentally, I’m much more sharp. That’s really important in bike racing. You have to be able to react quickly to the people around you. Overall, I feel like I function better when I consistently get lots of sleep.

Years ago, I remember a clinic Adam Myerson gave here in OKC. One of the big things I took away was about rest. He explained how the workout you did in and of itself did not make you faster. In fact, that workout made you slower. By the end of that workout, you are fatigued and in that moment you aren’t as strong as you were at the beginning of the workout. It’s the combination of work and rest together that make you stronger. If either side is out of balance, you won’t reach your optimal result. If you train too hard and rest too little, that’s bad. If you train too little and rest too much, that’s also bad. 

For me, 8 or 9 hours of sleep every night seems like the right balance. It’s not like I’d be doing anything productive past 10:00 anyway, especially in the winter time.  I would just be wasting time, starring at a screen (phone, tv, etc). Sleep is the much more productive choice. 

Thursday, January 15, 2015

Day 15 - Rock n Roll Gold Chain Lube

I mentioned the other day in my post about group riding that nobody wants to hear your noisy chain. It’s such an easy and cheap problem to fix. Buy some lube, spend about 10 seconds applying the lube, another 60 seconds wiping the chain, and go ride. Problem solved. You'll need to lube your chain approximately every 400-600 miles I would say; more if you are riding in bad weather. It definitely doesn't hurt to do it weekly.


A squeaky drivetrain is an inefficient drivetrain. You’re putting power into the pedals, but that power isn’t being as efficiently transferred to your back wheel as it could be. A clean and well lubed chain is faster than a dirty and/or squeaky chain. The lube you choose also has an impact on how efficient your chain is. People have tested various chain lubes, and velonews printed some results a while back. It’s crazy that the difference between the best lube and worst lube on the test is over 3 watts. I bet a dirty and squeaky chain is even worse than that. 


I stick with Rock n Roll Gold for a variety of reasons. First, it seems to last a while. I can go a couple weeks without needing to reapply before my bike starts to sound different. Second, there’s only one chain lube on the chart that tests faster, and that’s paraffin wax. With paraffin wax, you actually have to remove your chain, strip the chemicals off it, soak it in wax (in a crockpot, for example), remove it, let it cool, and then reinstall the chain. Maybe if I had a professional mechanic taking care of my bike I would consider if. For now, I would only consider putting in that much work for one or two races a season. 

Rock n Roll Gold is easy, and your chain stays very clean. You apply a lot of it to the chain. Make sure the chain is nice and went. Back pedal for 15-20 seconds. Then wipe the chain clean. Real clean. Just take an old t-shirt and keep wiping the chain until it looks new. It doesn’t take long. Probably a minute or two. Since the chain is pretty dry after you wipe it, the chain doesn’t seem to attract as much dust and dirt as a lube that leaves your chain wet. With RNR Gold you get the best of everything. A quiet chain. A clean looking chain. A fast chain.

I think most of the mechanics at Schlegel's really like it too. They sell it there, and it won't cost you much more (if any) than any of the other lubes. 

Wednesday, January 14, 2015

Day 14 - Simmons Racing custom cycling shoes

I'm kind of cheating today. This is a post I wrote back in 2011 when I got my Simmons shoes. My opinion hasn't changed much. I still love these shoes. Custom shoes make a huge difference. Recently I wore someother "high end" non-custom road shoes on a ride and my feet were killing me by the end. Plus I could feel the lack of efficiency in the soft upper of the non-custom shoe.

I really wish every cyclist could just try a pair. They would simply be amazed at the difference a shoe makes. I can't imagine anyone being satisfied with a stock shoe again after going with a custom like these. It's where your legs connect to the bike, so obviously it's an important contact point. You want it to be as stiff and light as possible, and I can't think of any shoe lighter and stiffer than the Simmons shoes. http://simmons-racing.com/cycling-2

I don't know how many miles I have on my shoes. Probably about 30,000, or at least close to it. That's a lot of miles. Dave Simmons can repair and even rebuild shoes for a very reasonable cost, so I'll probably do that soon; just to freshen them up a bit. Maybe I'll add a little bling to them. We'll see.

Anyway, here's what I wrote back in 2011:


I recently received my pair of full custom cycling shoes. There are countless reviews online about cycling components and clothing, but very little information on full custom footwear. In my opinion, shoes are one of the more important contact points when it comes to cycling performance, so I wanted to provide some information on the process of buying the shoes as well as the benefits I’ve experienced since I got them almost 2 months ago.
The cliff notes: These are extremely lightweight shoes that feel stiffer than anything else I’ve tried. They are so comfortable you don’t notice you have shoes on, and the performance is unreal. I’ve DEMOLISHED my 5 sec and 30 sec power records since I started using these shoes.

Full version:

The shoes I’m using are made by Simmons Racing (www.simmonscyclingshoes.com), a custom shop in Cape Coral Florida. The owner (Dave Simmons) and his wife have been making inline skates since 1991, but are relatively new to the cycling market. Every shoe is made by Dave and his wife from start to finish. None of the labor is outsourced. They are handmade in the USA.

Dave’s goal is to build the most comfortable, lightest, and stiffest shoe possible. He’s built plenty of shoes (in adult sizes) under 100 grams. The upper and sole are the same piece of carbon fiber, so it is stiff like nothing else you’ve ever felt.

The process starts with a cast of your foot. He has a video on his website to show you how to cast yourself, or you can schedule an appointment with him at one of the events he is attending. I flew out to Fort Wayne, Indiana to have Dave do the cast.

Your foot is wrapped in plaster and as the plaster begins to harden he has you put your weight on your feet to make sure the bottoms of your feet are formed well into the cast. He does one foot at a time and the process takes about 30-45 minutes. When he gets back to his shop he creates a replica of your foot using the cast. He builds the shoe around the replica of your foot so that the shoe is a perfect fit and conforms to every toe indentation and every bump on your foot. This isn’t just a custom insole or a heat mouldable shoe. The entire shoe is basically vacuum-formed around your foot as it is being built. It is the type of fit that no lacing system, straps, insoles, etc can provide you with. It is hard to describe, but when you put it on your foot you can almost forget it is there because it fits so well and it is so light.
Photobucket

Photobucket

You can customize a whole lot more than the fit. If you under or over pronate, Dave can build the shoe to compensate. There is no need to purchase wedges because the canting is built into the boot at whatever level you need.

The shoe is made for whatever cleat system you are using. I’ve talked to a lot of speedplay users who are limited on their footwear choices because they don’t want to use an adapter plate.


Cleat mounting is also fully customizable. You get to decide where the mounting block is on the bottom. If you think you’d rather have your cleats mounted further back or further forward than your current shoes allow, let Dave know and he can make it that way. Most stock shoes are designed so that the toes curve up. During your casting you can let Dave know exactly how much you want your toes to curve up. If you aren’t sure how much your toes should point up or where your mounting block should be, don’t be overwhelmed. If you don’t have a preference, Dave can build the shoes similar to what you are currently using.

The “lacing” system is up for you to decide on. You can get as few or as many buckles as you want. He can do laces if you want laces. If there is another lacing system out there you prefer (like a Boa type) he can do that too. I went with a single buckle. It is interesting that the custom fit is so good that I can run the shoes without the straps and not notice a difference until I get up to sprint.

I’m still realizing the full potential of these shoes. I knew they would be good based on the inline skating boots I’ve gotten through Dave in the past, but my expectations were pretty quickly surpassed. On the first ride I could tell this shoe was a step ahead in the evolution process of cycling shoes. Remember the first time you ditched toe clips for clipless pedals and you had that “Aha” moment where you realized this is how cycling shoes should work? Well, I had this moment all over again. Since the top of the shoe (the whole upper) is the made out of carbon fiber, the entire structure of the shoe is stiff. Your entire foot feels connected to the cranks, not just your sole. It is impossible to put the feeling into words, but if you are ever racing in Oklahoma, Texas, Arkansas, Missouri, or Kansas and have around a size 12 (47) foot, I’d love for you to take them for a spin so you can feel the difference for yourself.

They are noticeably lighter than anything else I’ve owned (Mavic, Sidi, Specialized, and Shimano).

I haven’t used aerolab or the chung method to test the aerodynamics of these yet, but I’m willing to bet the cda is lower than anything else I own, even if I don’t have shoe covers on these and I do on the others. Since it is an exact mould of your foot, I can’t see how the frontal area could be reduced any more. The buckle system I chose adds some drag, so if aerodynamics is a big concern for you, you may consider a different style of buckle, but I like these for the ease of on the fly adjustment.

There really isn’t a need to really crank down the strap because the shoe fits so well. When every square millimeter of the shoe is hugging your foot, you don’t need to go crazy with the straps. Think of trying to tighten something with 1 bolt vs using 4. With 1 bolt you have more fatigue at the spot where the bolt is located. If you use 4, the pressure is distributed over a larger area and that distribution will keep you from putting too much pressure on one spot. These Simmons shoes are like the ladder. You don’t get hot spots while riding because the tightness of the shoe isn’t just located along the straps, it is all over.

So how does that relate to performance? At first I thought I was just getting a benefit in the first 6 to 10 pedal strokes and then everything went back to normal, but it was more than that. I could tell my jump was much stronger, and the powertap confirmed it. Pretty much any day of the week I can go out and put out a higher 5 sec power number than my previous record with my Mavic Zxelliums.

I thought that was the extent of it, but then I looked at some other sprints I had done in the mavics and noticed that my 15 sec power was higher on the new shoes as well. Last night I did a 30 second effort and blew my old 30 sec record out of the water. It wasn’t even close, and oddly I didn’t even feel great riding last night.

Tuesday, January 13, 2015

Day 13 - Jagwire Incisor Cable Cutters

I try to do as many of my own repairs on my bike as possible. A real mechanic at a bike shop can do it way better than I can do it myself, but I’m trying to get better. One thing I’ve realized is that having the right tool for a job is pretty important. A lot of the work on your bike CAN be done with a multitool, but having "real" tools usually makes the job easier. 

When it comes to cutting cables and cable housings, a good pair of cable cutters is a must. 

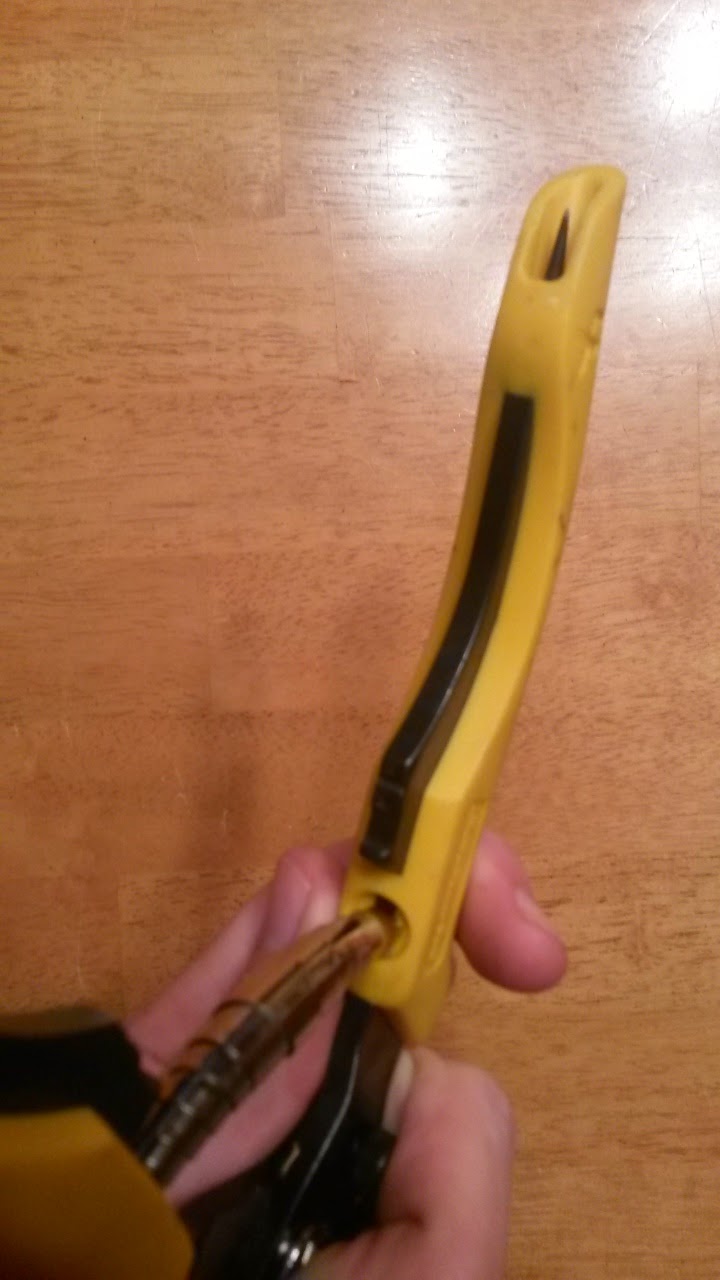
I picked up these Jagwire cable cutters from Schlegel's a few months ago. I think it was Daniel and Marty that recommended them; maybe it was also Joey. The price was super affordable. They work so great that I couldn't imagine wanting to spend more for anything else. These things are awesome.


They are super sharp and have lots of leverage. They go right through the inner wires and housings. Shift cable housing and brake cable  housing are equally as easy. The first time I tried to do this job myself I assumed that my Craftsman (or something like that) dikes would be just fine. They weren't. They are like butter knives compared to these. 

I've mentioned before that I really like functionality, and tools with multiple purposes. These cutters have a few "hidden" features to them. They have built in crimpers for the end caps that you crimp onto the cables. They also have an awl built into one of the handles. You poke the awl through the cable housing in order to round the housing back out and eliminate friction on the inner wire. 


Monday, January 12, 2015

Day 12 - Vittoria Latex Tubes

The “standard” tubes that I’d say 99% of cyclists use are made out of butyl rubber. If you walk into a shop and ask for a tube, they’ll most likely hand you a butyl tube. If you buy a new bike, it probably has butyl tubes in both wheels. Butyl tubes are cheap and hold air pressure for a long time. If you don't know what the tubes in your bicycle are made out of, I'm willing to bet it is butyl rubber.  Butyl tubes are fine for training. When it comes to racing, latex is always better.

I've used Vittoria latex tubes and Challenge latex tubes. Both worked equally well for me. If I recall correctly, they both have removable valve cores. That's important if you have deep wheels. You want to be able to remove the valve core to add an extender. Here's a Vittoria tube with the best style of zipp extenders. 


Latex tubes are better because they have a higher elasticity. There’s less energy loss as the tube/tire are being deflected over rough surfaces (the road). Rolling resistance tests show approximately 5 watts worth of energy saving. The rougher the road, the more benefit you should see. Oklahoma has some poor roads, so these tubes arepretty valuable. $30 for a pair is worth it. The tubes also offer a more supple ride, and people claim that they corner better. It would make sense, since the contact patch of the tire should be a little more stable due to the suppleness of the tube. Most good tubulars have latex tubes inside them, which is probably a big part of why most riders say that their tubular tires feel better than their clincher counterparts. Vittoria, challenge, schwalbe, etc all use latex tubes. Continental is way behind the times and still uses butyl, which is why you won’t see me running conti tubulars, even though i really like the conti clinchers. 

I’m not a great person to ask about “feel,” but I know others that swear by it. I’m also not the type of guy that can notice the stiffness in stems, seat posts, etc. That doesn’t mean the difference isn’t there or that other people can’t feel it; I’m just saying that I’m not good at pointing that stuff out. 

There’s also claims that a properly installed latex tube with give you less pinch flats. I’m not sure how you can prove that to be true, but I can say that my latex tubes last me a really long time without flatting. In fact, I have a latex tube in my front wheel right now. I can’t remember when I installed it. It was a tube that went flat in my race wheels. I put some Bontrager liquid latex (for tubeless tires) in the tube and installed it into my training wheels. I know I’m an idiot for saying this, but the tube has held up great. I probably have 2000 miles or so in that tube, and don’t foresee any issues soon. 

Latex tubes have a few downsides.
  • They cost double or even triple what a butyl tube costs. 
  • They lose air faster than butyl tubes. Most people say they have to inflate their latex tubes every couple of days. With sealant in them, I probably inflate mine once per week. 
  • Some people say that they are more tricky to install. I find that if you put a little bit of air in each tube before you install it, it’s not any more difficult than a butyl tube. Plus, if it is pinched under the tire you can easily see it because latex tubes usually come in funky colors. Vittoria are pink. Challenge are red. I think michelin are green. 

Latex tubes are different than “ultra light” butyl tubes. “Ultra light” butyl tubes are not as fast as latex tubes. The only purpose I can think of for an “ultra light” butyl tube is for your seat bag is you have a very tiny seat bag. I think the ultralight tubes are a little smaller when they are rolled up, so you can fit them into your bag easier. Do you want to trust an ultralight tube as your only spare? That’s up to you. 

You don’t buy latex tubes because they save weight. You buy latex tubes because they roll better, feel better, and possibly corner better. 

Sunday, January 11, 2015

Day 11 - A Well Organized Group Ride

I had a few different ideas for the post today, but after the Schlegel ride today I'm inspired to write about group rides. Usually when somebody attends a group ride and is "inspired" to make a post about what a good group ride should look like, it's because they just had a really bad experience on a ride. The opposite is true here. The ride today was on of the best group rides I've done in a while. It was fast, but not too fast. Overall, the group seemed to stay pretty tight and tidy. There was very little surging, but yet everyone got a really good workout.

A few hours before I left the house I was teetering back and forth on whether or not I wanted to go. It's cold out. It's raining. I'm sick of cleaning my bike. I have a nice warm room in the house with a great trainer sitting there. In the end, I reminded myself about what I posted the other day. There's hardly ever been a time that I've ridden outside and wished that I was inside. I decided to take the chance and ride today.

When I say "well organized," I'm not talking about printing maps, hanging flyers, promoting on facebook, water stations, food afterward, etc. (all of that stuff is fine, it's just not what I'm getting at in this post). I'm talking about how the people who show up ride in a group setting.

Before I get too far, I'll admit that I've broken every unspoken group-ride rule. I've been the guy that attacks the group over and over. I've been the guy that tries to "win" the group ride. I've been the guy that tries to ride 3-wide. I've been the guy who surges up every climb and coasts down the other side. I've been the guy who pulls off the front when we are riding two-by-two and cuts back in 3rd or 4th wheel so i can take another pull, completely not realizing that the people behind me want their chance to pull also. I'm sure I've one all the things that get on my nerves now, and still probably do stuff that annoys others on the group rides, but here's a few things that makes a great January group ride better than a good January group ride. It's January, so on the group rides that consist of mostly racers, the pace is picking up a bit.

1. When you are on the front, pedal your bicycle. Pedal up the hills. Pedal down the hills. Pedal the flats. If you aren't pedaling, you aren't training. If you aren't pedaling on the front, nobody behind you can pedal. If you coast down hills, everyone behind you is jamming on their brakes. Just as they are braking, you are now on the hill, probably hammering up it. This creates an accordion effect. Accordions drop the weaker riders.

2. When you are on the front going downhill, pedal until you run out of gears... and don't give me a line about keeping it in your little ring during this period. If you can keep up with the group and keep your wattage up downhills, stay in your little ring all you want. If you are having to coast because you don't want to shift into your big ring, do that at the back of the pack. I don't really understand the philosophy anyway. I get trying to keep a high cadence, but if that's the case then worry about your cadence, not your gearing.

3. When you are on the front, pedal at a steady effort level. If you have a power meter, try and keep your wattage pretty constant. I'm not impressed that you are climbing a hill at 400 watts if you are coasting down the other side, or soft pedaling at 100 watts. Try to go downhill just as hard as you go uphill. This makes sure everyone behind you is getting a steady workout too. If you are pedaling hard down the hill, they are having to pedal too.

4. At this time of year, when you are on the front you should be riding pretty hard. Not hard as in trying to drop everyone behind you. Don't be a jerk about it. Just ride hard enough that the people behind you are getting a workout too. I think this is where the Schlegel ride really got it right today. I don't think we dropped anyone (I turned off early, so maybe it got crazy after) but it was pretty fast the whole time. When people were on the front, they weren't chatting. They were working. It was a pace where most people in the pack (we had cat1 through cat5 and masters in the group) could chit-chat in the back most of the time, but you were never cold because the intensity was high enough.

5. When you are on the front, figure out where the wind is coming from and ride accordingly. Don't just put it in the gutter an gun it, or the less strong riders will get dropped.

6. If you are a stronger rider, read the wind and try to ride on the more difficult side of the group. This ensures you are getting your workout, and gives the less strong riders a better chance of staying in the pack.

7. It's not hummus if there's no tahini in it. Oops, that's for my food blog.

8. Ride two by two

9. Don't cross the yellow line or the center of the road (when there's no yellow line).

10.  Come prepared, and show up on time. Don't make the group have to wait in the parking lot for you. Have enough food and water. Have everything you need to change a flat.

11. The city limit (or any other marker) sprint - There's nothing wrong with sprinting to a known point on the ride. It's great practice. Don't feel weird about doing it. We all realize there's no prize at the end, but there's no reason not to go for it. DON'T COUNTER-ATTACK THE CITY LIMIT SPRINT. It happens so often. Don't do it. Let the guy who won the sprint have his glory. Slow the pace down until everyone in the group is back on, and then continue.

12. Don't attack through yellow lights, stop signs, etc.

13. If you come up to a stop sign around the same time as a car, announce to the group that you are stopping and wave the car through the intersection. Enough drivers hate us already. Instead of making the car wait for 40 riders to go through an intersection, just wave the car through.

14. Eliminate gaps in the field. Try and ride somewhat close to the guy in front of you, and somewhat close to the guy next to you. Try no to overlap wheels, but also don't leave 3, 4, or 10 feet between you and the next guy.

15. Lube your chain. I'll probably talk about this more at some point within the next week. Chains should be lubricated every couple hundred miles. If you don't lube your chain frequently, it will make a lot of noise. It's definitely not the most annoying thing in the world, but nobody wants to hear your chain sing all ride.

Most of all, I think the ride needs to stay true to what it was intended to be. If it's supposed to be a no-drop ride, then it should be a no drop ride. If it is a team ride with a certain plan, stick to it. If it's a ride that was put together where everyone is supposed to attack each other, then by all means ignore the suggestions above (except #15).